Share
Pin
Tweet
Send
Share
Send
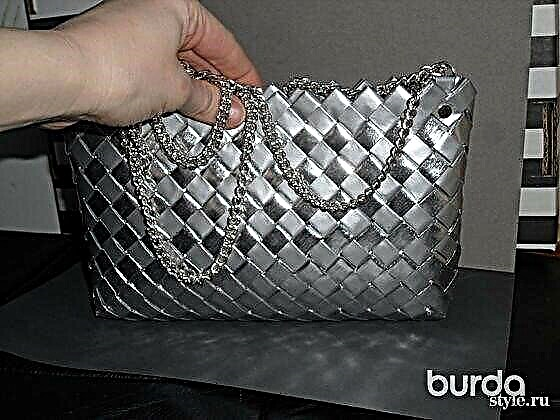
Here I will tell you how to make an evening bag. It turns out to be more elegant depending on the material chosen, and here you can give vent to your imagination.


So:
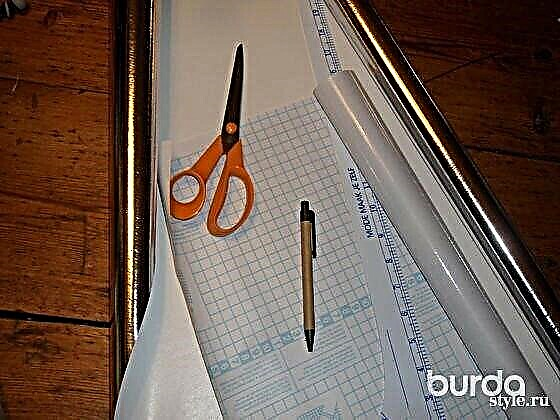
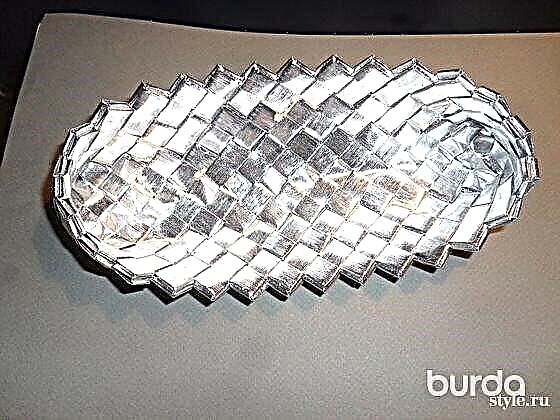
1. Combine paper and film. Glue the film very carefully, slowly, so that no bubbles and wrinkles form. About 200 cm of paper 70 cm wide took my little "golden" handbag.
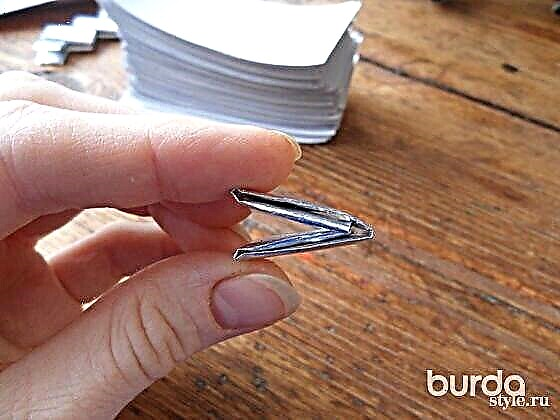
2. Spread the paper into rectangles (I took the smallest possible size) 4 cm wide and 9 cm long. So, there will be 1 cm on the hem on both sides and the width of the finished strip-blank will be approximately 1 cm, respectively.
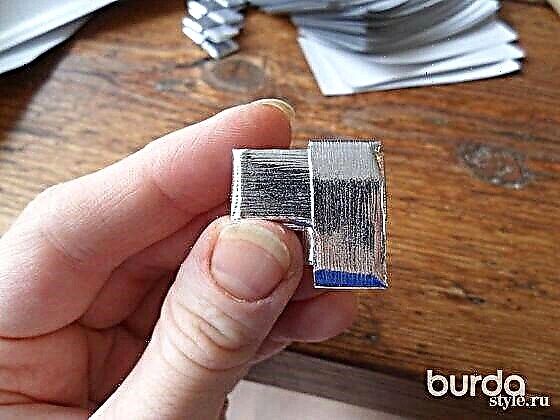
3. Take the first rectangle and fold it along in half inside out. Now fold the side parts to the middle. You fold the resulting narrow strip across this time (so that the workpiece is half as long). Fold the ends of the strip so that they are inside (see the folding order in the photo). The first link of the future chain is ready!
4. Do the second "link" of the chain in the same way as the first, and all subsequent ones without changes.
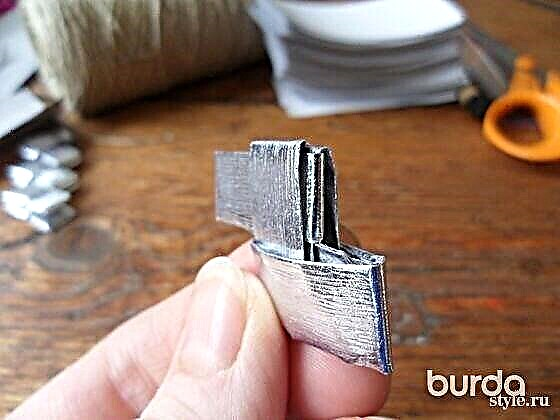
5. Thread the ends of one link into another, as shown in the photo (insert the “loops” of one link into the “loops” of the second).
6. So, threading link by link, make a chain of the length you need. I have a chain of 56 links. The ends of the chain are neatly and imperceptibly connected using a strong thread (I used twine / twine) and a darning needle with a blunt point.
7. Depending on what size and shape you want to get the handbag, make the right number of chains - "floors". I got 7 floors + the bottom of the bag. But do not stitch all floors at once. Sew two together to get started. You will sew them to the bottom. It will be more convenient. When this is done it will be possible to sew the remaining rows of floors.
8. Now more complicated: make the bottom of the bag. It reminds me of an elongated rectangle (see photo), but the bottom may be wider. Empty "cells" are filled with missing links. Then, floss the bottom well with a thread so that all the links fit snugly and neatly to each other and no flaws are visible anywhere. I flash the bottom two times so that nothing is clear.
9. We connect the bottom to the already stitched two chains. Pay particular attention to the corners of the bottom. They, too, can be stitched in two passes to fit perfectly. Here at first I had difficulties. Sew row by row the rest of the chains.
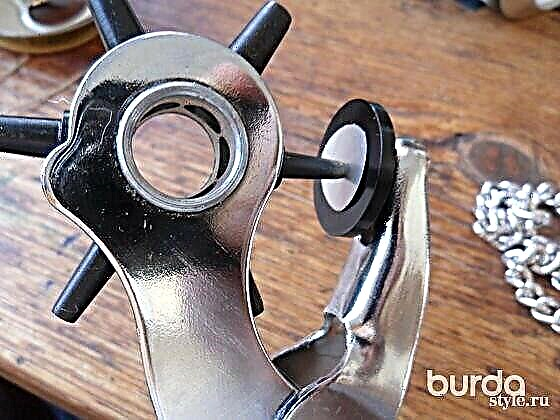
10. Well now! The point is small: sew a lining of a suitable fabric, install a magnetic clasp, attach a chain. When you remove the lining, immediately attach the magnet lock to it, and only then glue the lining to the bag. I put the cover on hot glue (glue gun). For fastening the chain there is a special hardware consisting of a rivet and a plate, which has a hole for riveting on one side, and an eyelet for the chain or strap of the bag on the other. It’s good to add to this fittings an additional reinforcement in the form of two circles with a hole for riveting on both sides of the bag (and there are four circles). I made two mugs (only on the inside) from a can. This is necessary to prevent tearing of the bag material.
Holes can be punched with a not very thick nail with a hammer.In addition, in order to make suitable holes in the right places near the bag, there is a special tool that accurately cuts a hole of the right size.
The length of the rivet shaft must be sufficient to pass through the entire thickness of one side of the bag. Between themselves, the parts of the rivets are connected with the help of confident hammer blows. In order not to damage the surface of the bag and the desktop, I used a piece of thick cardboard, and hit the rivet through it. Now you can insert the chain into the loops. Done!
I hope you enjoyed my workshop. If something remains incomprehensible - I will be happy to answer all questions! Enjoy your creative process!
Share
Pin
Tweet
Send
Share
Send