I do not pretend to be a professional, but I adore sewing) Both clothes and accessories) I really want everyone to sew, so I tell you as much as possible.
There are 13 photos in MK; for each, a description is given


1. maletín - in Spanish, "suitcase". The size of my suitcase is 28x16x16. Intentionally made him small. The size, of course, can be changed if desired, because usually such bags are larger. My bottom and longitudinal walls are equal, these proportions can also be changed if desired.
2. This photo is all that we have as a pattern)) But nothing, we are women))
3. So, we need:
1. The base fabric is about 0.3 m with any fabric width (for my sizes). You can sew from the pieces left over from something, because tissue consumption is very small. I took a thick satin crepe satin side. You can take any fabric, the main thing is that it keeps its shape well. Ideal leather, artificial or natural. Then the bag will be more practical and will last longer.
2.Lining. I have a twill. You can take any lining fabric. The expense is the same.
3.Very hard adhesive non-woven. I bought this specifically for bags, black. The expense is the same.
4. Plastic napkins for hot)) In the photo there are only the remaining pieces, usually they are 30x50 in size. There are two of them. This is to give the bag volume so that it holds its shape better. You can use any thin plastic.
5.Special foot for attaching zippers. I have one.
6. A hole punch for skin.If not, you can take the bag to the atelier or shoe store. If this is not possible, use small scissors to cut holes (this is difficult, but possible)).
7. Metal screw rivets - 6 pieces. They consist of 2 parts: one decorative front, and the second reverse screwed into the first. Or, again - to the workshop.
8. A small piece of black leather for pens and reeds.
9. Metal zipper no less than the length of your bag. Better detachable.
10. Well and of course the machine, thread, scissors, meter)))
4. We cut and cut out the details according to the instructions in the photo. I left 1 cm for the allowances, but you can make a larger allowance.
5. Once again, we cut and cut out the details according to the instructions in the photo.
6. We iron the non-woven to all the details: to the base and to the lining. First, from the wrong side, then we fix-iron from the front. We put aside for 20 minutes to cool in an even, straightened position.
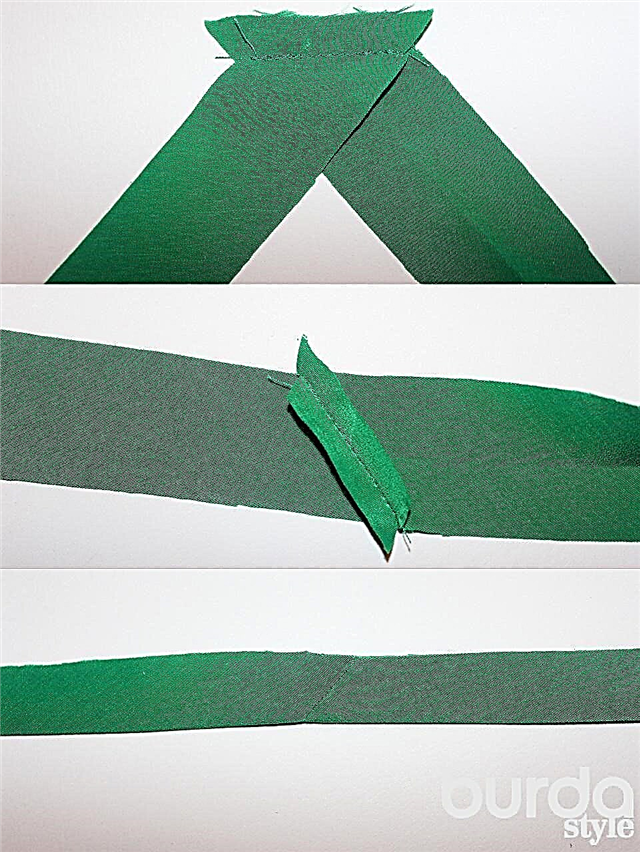
7. Make handles: bend the longitudinal sections of the handles along the middle with the wrong side inward, fold the handle along the middle, closing the longitudinal sections, lay a line along the folds as shown in the photo.
8. Stitch the zipper as shown in the photo: overlay the halves of the zipper with the outer side on the longitudinal sections of the walls from the base so that the edges of the braid lie on the edges of the sections. Lay the line as close to the teeth as possible.
9. Increased as much as I could. We carry out longitudinal seams on the details of the base: we fold the bottom and wall parts with the front sides and grind at a distance of 1 cm (at a seam allowance).Now we attach the handles to the base. To do this, we mark the position of the ends of the handle with small chalk on both walls symmetrically.
10. We put the walls from the base to the plastic parts from the wrong side and make a hole with a hole punch according to the marking. Turn the ends of the handles 1 cm and make a hole. We install the riveting by screwing the handles to the walls, while grabbing the plastic wall parts.
Next, we grind the side slices of the rectangles to the side slices of the triangles: fold them with their faces and lay a line. We turn the bag out and iron the seams from the inside with a fingernail.
11. Make the tongues: longitudinal sections of the skin strips are folded to the middle with the wrong side inward, along the folds we lay along the line. We fold the tongue as shown in the photo and attach it with rivets to the upper ends of the side walls of the base by analogy with the handles, again grabbing the corresponding plastic parts.
12. On the lining details, perform all the seams in the same way as they did on the basis. Do not twist. Cut seam allowances close to the seams. Insert the plastic bottom into the base. Put the lining in the bag. Sew manually the lining to the braid of the zipper and to the ends of the sides.
13. Voila!