This needle bar is simple and quick to sew and convenient to use. And you can decorate to your liking.

It would be more logical to call this needle box a mace. Since it is worn on the finger and it is most convenient to use it in the process of cleaving parts with pins or, conversely, removing the pins with which the fabric was fastened. Sewing this accessory is quite simple - a beginner will also cope. It is better to take fabrics that include pins well, such as cotton or linen. This needle bar is decorated with beads after it is sewn. But you can decorate this, for example, with embroidery - then it is better to do this before cutting out the details.

Needle case of unusual shape: master class
You will need:
- a small flap of tissue;
- ruler;
- chalk or pencil for fabric;
- tailor's scissors;
- needle for hand sewing;
- tailor pins;
- sewing machine and thread;
- iron and ironing board;
- filler;
- if you decorate the needle bar with beads, as in this master class, - beads, a thin needle for beads and fishing line.
Autumn time: do-it-yourself felt needle case
Step 1

Cut out a square piece for the needle bar. If the fabric is thin, the size of the part is 10x10 cm. If the fabric is dense, as in our case, it is better to add 0.5 cm for each side.
Step 2

Lay the part upside down.On the upper right corner, measure from the corner 2.5 cm to the left and down, bend the corner, as shown in the photo, and iron.
Step 3

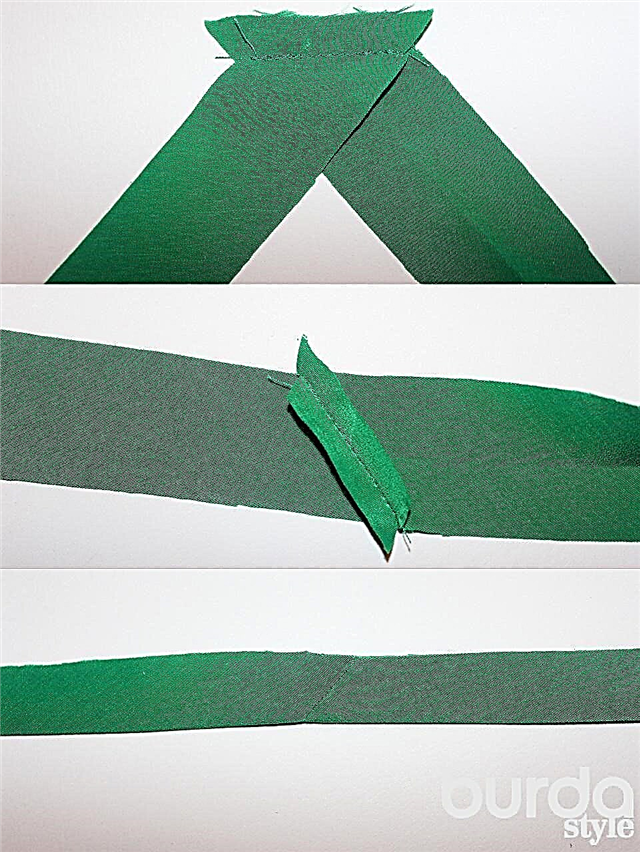
Fold the part diagonally with the front side inwards.
Step 4

Lay the stitch as shown in the photo. The line at the top right should capture the bent corner. At the bottom, finish the stitch around the middle. At the beginning and end, make the tack.

Cut the corner by stepping 2 mm from the stitch.
Step 5

Turn the needle bar out and straighten the corners.

Fill the needle bar with filler. It’s better not to fill it too tight, but you should make sure that the filler fills that angle, which is 90 degrees.
Step 6

Now you need to sew up the open area manually with a blind seam. To make sewing easier, you can tuck in allowances and fix the folds with an iron.

Sew almost to the end.
Step 7

Now you need to fill the corner just sewn into the opposite, there is just a hole left for this. It is convenient to do this by helping yourself with a needle. Secure your success by fastening the ends of the needle bar with a pair of pins, as shown in the photo.


The ends of the needle bar must be sewn as firmly as possible.

In principle, the needle bar is already ready - you can put it on your thumb (or on the other, as convenient) and use it. But we will still decorate it.
Step 8

Take the thread in the color of the beads, thread it into the bead needle, at the end, make a large bundle (larger than the holes in the bead so that the beads do not come off). String the beads on the thread - the chain should be the length by which we want to decorate the needle box with the bead chain. Here the chain will go all over the seam, corner.After stringing the beads, fasten the thread with the chain where the corners are sewn. The beads should not sit too tight on the thread: leave a piece of loose thread about 0.4-0.5 cm.
Now put the fishing line in the bead thread and begin to sew the chain over the edge in the seam, making sure that the stitches fit between the beads. When finished, fasten and cut the fishing line. Done!


Master class and photo: Natalya Pykhova